
Sword Making - Option 1: Wooden Sword / Knife
To make a model sword not a practice weapon.
If you are a beginner this is good practice in fitting the pieces together. If you cannot make good fits in wood then metal is out of the question. Wooden models are often made by professional bladesmiths. The prototypes of the blades made for the Rambo movie are in the Knife Museum in Chattanooga, Tennessee. These were carved in one piece from a pine 2x4 (framing lumber). Several were made and submitted to the director of the movie before the actual blade was made. If top professionals do it, then why shouldn't you?
A sword is nothing more than a BIG knife. The parts are all the same. I suggest making knives first because it is much easier and if you screw up you have lost a lot less time and material. This is also somewhat true in making a wooden model.
Hard maple is one of the best woods for making almost anything from musical instruments to furniture. I recommend it for this project. There are other dense grained hardwoods that will also work such as cherry or walnut. A good piece of pine will also work but in fact the soft woods are harder to fit and work well than hardwoods as they do not file well.
Tools Needed:
- C-clamps
- Table or work bench (this is light work and a kitchen table will do)
- Band saw, jig saw or sabre saw.
- 3/16" or 1/4" wide mortising chisel.
- Files and Rasps (several types)
Four in Hand (multi-purpose file/rasp)
Nicholson #39 or #40 Cabinetmakers Rasp
12" Mill file bastard cut
10" Flat bastard cut
8" Round rough cut - Sandpaper (Optional may be replaced by Scrapers)
120 grit cloth backed (belts or sheets)
240 grit cloth backed (belts or sheets) - Sanding Block(s)
- Hand Scraper with burnisher (standard wood working or hand made).
- 1/4" Drill (hand or electric), 7/32" and 1/4" bits.
NOTE: I have carved similar items in significant detail starting from a green log using nothing more than a hand axe and a pocket knife. The tool list above is for the non-primitive wood worker to give them the best chance at producing the final project. If you have the skills or want to study primitive wood working seperately you can do with much less.
Materials:
You will need to obtain some hard maple or other suitable wood. If you can, order a 1/4" thick board. 1" wide is suitable for a reasonable knife or dagger and 2" for a big Bowie or sword. If you only find thicker stock then you will need a way to saw it (table saw or band saw).Optionally if you want to make this a classy project you may want some colored fruit or nut wood for the guards and grip or stain them individualy.
Method:
[Tang Layout Drawing]
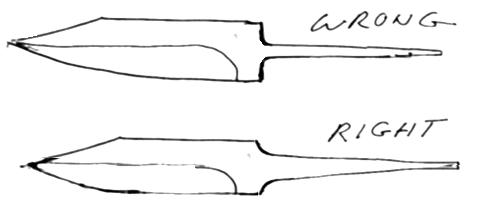
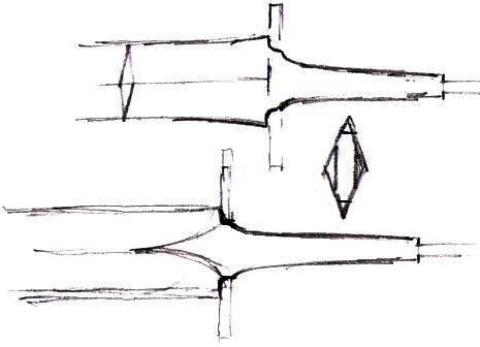
Starting from the 1/4" slab you will need to layout the shape of the blade in pencil. Be sure to have large radii where the tang attaches to the blade. I recommend 1/4" minimum. Sharp corners cause stress concentration and result in blades that break at the tang. The longer the blade the heavier the tang should be.
Profiling: Saw the shape including the tang using a bandsaw, scrollsaw or jigsaw. This is called profiling and is no different than making a steel blade by the stock removal method. However, you will need a slow speed metal cutting saw to blank out a blade in steel. Sometimes (rarely) profiling is done by grinding steel and a belt sander/grinder can be used for either wood or steel. After the profile is rough cut it is finished by filing. The smoother the tang surfaces the less likely they are to be a source of cracks and possible breakage. Remember, if you have difficulty fitting the wood, metal is much more difficult.
Shape the blade by rasping, sanding/grinding and scraping. If the blade is double edged draw center lines on the sides and edges to work to. Wood cuts very quickly and it is easy to make a mistake. Plan on doing the finish shaping with a hand scraper. A pocket knife or draw knife can substitute for a scraper but scraping is hard on thin blade edges.
[ Diagram of Knife Parts ]
Saw out the guard from a waste piece of the blade stock or other hardwood. Drill two starter holes as shown and then cut out the space between with a chisel or jeweler's saw. Carefully fit the guard to the radius seat on the tang. A well fitted guard has no visible gaps at the tang joint.
Block out the pommel from a piece hardwood. Note that final shaping may be done in assembly with the grip. Drill the tang hole as shown. Fit the pommel to the end of the tang. It should be able to slip on a little farther than where the end of the grip is going to be. Normally the pommel is riveted onto the tang or threaded on. In wood we will glue or wedge.
The grip is made from two slabs of hardwood. The hole for the tang will be carved (inlet) into the two pieces and then they will be glued together making a tapered rectangular hole that fits onto the tang snuggly. Carefully block sand the front surface of the grip until it must be tapped onto the tang to seat against the guard. Block sand the back end of the grip flat until it fits cleanly with the pommel. Shape the grip with a rasp and files. Finish the front then assemble and work the grip and pommel together with files and sandpaper to make a perfect fit. Disassemble and finish sand the grip being careful not to round the corners that fit the guard and pommel.
The finished sword or knife can be lacquered of finished with hand rubbed varnish before assembling. The assembly can be done with glue or by wedging the pommel. In fine blade making epoxy resins are used to fit grips making a perfect permanent fit. On this project any glue may be used if desired. Using clear epoxy would be good practice as it is tricky to keep it off finished surfaces.